

Cats have a natural instinct to play. They often find joy in simple, everyday objects like boxes, strings, and paper. These items can spark their curiosity and keep them entertained for hours. Creating engaging playthings doesn’t have to be expensive or complicated.
With a little creativity, you can turn household items into fun and stimulating activities for your feline friend. From cardboard structures to yarn-based creations, there are countless ways to repurpose materials. These projects are not only cost-effective but also environmentally friendly.
For example, a simple toilet paper roll can become a quick and easy toy. Cardboard boxes can transform into intricate playhouses. These DIY ideas encourage physical activity and mental stimulation, keeping your pet happy and healthy.
Why Homemade Cat Toys Are a Great Idea
Repurposing everyday items can bring endless joy to your feline companion. Not only is it a fun and creative process, but it also offers numerous benefits for both you and your pet. By using materials you already have at home, you can create engaging playthings that are both cost-effective and environmentally friendly.
Benefits of DIY Cat Toys
Creating your own playthings has several advantages. First, it reduces waste by repurposing items like old T-shirts, toilet paper rolls, and wine corks. This makes it an eco-friendly choice. Second, these projects are budget-friendly, saving you the $60+ that the average pet owner spends annually on store-bought toys.
Additionally, DIY playthings provide mental stimulation. Puzzle toys made from a cardboard box or fabric scraps can keep your pet entertained for hours. This helps prevent boredom and promotes a healthy, active lifestyle.
Materials You Already Have at Home
You don’t need to buy special supplies to create fun activities for your pet. Many common household items can be transformed into engaging playthings. For example, toilet paper rolls can be turned into treat dispensers, while wine corks can be used as lightweight batting objects.
Other materials like fabric scraps, cardboard, and even old socks can be repurposed. Always ensure the materials are safe and free from small parts that could be swallowed. With a little creativity, you can turn these items into hours of fun for your furry friend.
Toilet Paper Roll Toys
Toilet paper rolls are more than just trash—they’re a source of endless fun. These simple household items can be transformed into engaging activities that spark curiosity and excitement. With a little creativity, you can create playful designs that are both entertaining and stimulating.
Simple Roll Fun
Start with the basics. A plain toilet paper roll can be used in multiple ways. Fold the ends to create a small ball or cut slits along the sides to make a springy shape. These designs encourage batting and chasing, providing hours of entertainment.
Safety is key. Ensure the roll is free from sharp edges or small parts that could be swallowed. Always supervise playtime to keep things fun and secure.
Treat-Filled Roll Variations
Take it up a notch by adding treats. Fold the ends of the roll to conceal a few cat treats inside. This creates a puzzle-like activity that rewards curiosity and effort. For added interest, use premium options like Orijen or ACANA treats.
Experiment with folding techniques to make the treats harder to access. This keeps the activity challenging and engaging. With these variations, a simple toilet paper roll becomes a versatile and exciting plaything.
Feather Fascinator
Feathers can bring a new level of excitement to playtime. Their natural movement and texture make them irresistible for pets. Crafting a feather fascinator is a simple yet effective way to create an engaging activity.
Materials Needed
To get started, gather the following items:
- Craft feathers (assorted sizes and colors)
- Embroidery thread or string
- A plastic ring or small hoop
- Needle and glue
These materials are easy to find and affordable. You can also repurpose items like elastic bands for added flexibility.
Step-by-Step Instructions
Follow these steps to create a feather fascinator:
- Attach the feathers to the plastic ring using embroidery thread or glue. Ensure they are securely fastened.
- Add elastic tension by attaching a string or elastic band to the ring. This allows for optimal movement during play.
- Test the durability of the feathers. Opt for sturdy types like ostrich or turkey feathers for longer-lasting fun.
For visual learners, a video tutorial can provide additional guidance. This DIY project is quick, easy, and sure to delight.
Ultimate Kitty Puzzle
Combining simple materials like cardboard and boxes can create endless fun. These items, often overlooked, can be transformed into an interactive puzzle that keeps your pet engaged for hours. By integrating toilet paper rolls and other household items, you can design a stimulating activity that challenges their curiosity and agility.
Combining Toilet Paper Rolls and Boxes
Start by assembling a sturdy base using a cardboard box. Cut holes of varying sizes to fit toilet paper rolls. These rolls can act as tunnels or treat dispensers, adding layers of complexity. Secure the rolls with non-toxic glue to ensure durability during play.
For added excitement, incorporate egg cartons or pipe cleaners. These elements introduce different textures and challenges, making the puzzle more engaging. The key is to create a structure that encourages exploration and problem-solving.
Adding Extra Elements for Fun
Enhance the puzzle by sprinkling catnip inside the rolls or boxes. This natural herb attracts pets and keeps them interested. You can also hide small treats within the structure to reward their efforts.
Safety is crucial. Ensure all materials are free from sharp edges or small parts that could be swallowed. Choose balls or objects that are too large to pose a choking hazard. Regularly inspect the puzzle for wear and tear to maintain its safety and functionality.
To keep the activity fresh, rotate the elements or adjust the difficulty level. This ensures your pet remains challenged and entertained. With a little creativity, you can craft a puzzle that provides endless fun and mental stimulation.
Cat Scratch Door Hanger
Transform a simple wooden board into an engaging activity. This project combines practicality with playful design, making it a great addition to any home. Using sisal rope and hot glue, you can create a durable and decorative door hanger that’s both functional and fun.
Using Sisal Rope and Hot Glue
Start by selecting a sturdy wooden board as the base. Sisal rope is a popular choice due to its durability and natural texture. It’s also safer for pets compared to synthetic options. Secure the rope to the board using hot glue, ensuring each layer is tightly wound.
For added stability, consider using child and pet-safe adhesives. This ensures the hanger can withstand regular use without coming apart. Always check the weight specifications to ensure it hangs securely on your door.
Decorating with Pom Poms
Add a touch of creativity by decorating the hanger with pom poms. These colorful accents can be attached using glue or tied with decorative string. Experiment with different color combinations to match your home’s aesthetic.
For seasonal flair, rotate the decorations. Use bright colors in the summer and warm tones in the fall. This keeps the hanger fresh and engaging throughout the year.
Tree Stump Scratch Pad

Bring the outdoors inside with a rustic tree stump design. This scratch pad combines functionality with a natural aesthetic, making it a perfect addition to any home. Using bark and wood, you can create a durable surface that appeals to your pet’s instincts.
Creating a Rustic Look
Start by sourcing bark or wood pieces. Alternatives include fallen branches or reclaimed lumber. Use Sussie and Kich’s bark/wood glue method to secure the materials. This ensures the pad stays intact during use.
For a polished finish, wrap the bark in a spiral pattern. This technique not only enhances the rustic look but also provides a textured surface. Vertical scratching surfaces are ideal for stretching, while horizontal ones mimic natural scratching behaviors.
Adding Catnip for Extra Appeal
Enhance the pad’s appeal by sprinkling catnip on the surface. This natural herb attracts pets and encourages interaction. Refresh the catnip every two weeks to maintain its effectiveness.
For heavy users, add stability enhancements. Secure the base with non-slip pads or weights. This prevents tipping and ensures the pad remains safe and functional over time.
Cardboard Catscraper
Cardboard is a versatile material that can be transformed into endless creations. With a little effort, it can become a functional and engaging structure for pets. A cardboard catscraper is a perfect example of how simple materials can be repurposed into something exciting.
Building a Sturdy Base
The foundation of any cardboard structure is crucial. Start with a base that’s at least 12×12 inches to ensure stability. Use thicker cardboard pieces for the base to support the weight of the entire structure.
Shelterness’s dowel reinforcement system is a great way to add extra strength. Insert wooden dowels into the corners of the base for added durability. This ensures the structure can withstand playful activity without tipping over.
Stacking Cardboard Pieces
Once the base is secure, begin stacking cardboard boxes or pieces. Cut holes in each layer to create tunnels or platforms. This adds an interactive element, encouraging exploration and play.
For themed decorations, consider painting the cardboard or adding stickers. Use non-toxic materials to ensure safety. Place small toys or treats inside the layers to keep the activity engaging.
Disaster-proofing is essential. Secure each layer with non-toxic glue or tape. Regularly inspect the structure for wear and tear to maintain its safety and functionality.
Wiggle Wand DIY Kitty Toys
Crafting a wiggle wand is a fun and rewarding project for pet owners. This simple yet engaging plaything combines creativity and practicality, making it a great addition to any home. With just a few materials, you can create a wand that keeps your furry friend entertained for hours.
Materials and Tools
To get started, gather the following items:
- Leather cord or synthetic alternatives for durability
- Small bell for sound stimulation
- Assorted felt pieces for decoration
- Colorful feathers for added movement
- Superglue for secure attachment
When choosing materials, consider safety and durability. Opt for non-toxic options and ensure all parts are securely fastened to prevent choking hazards.
Assembling the Wand
Follow these steps to create your wiggle wand:
- Attach the bell to one end of the leather cord using superglue. Ensure it’s tightly secured to prevent it from coming loose during play.
- Create a feather cluster by grouping feathers together. Secure them to the other end of the cord with glue or by tying them tightly.
- Add decorative accents using felt pieces. Cut shapes like stars or circles and glue them along the cord for visual appeal.
For added safety, always supervise play sessions. Store the wand in a dry place to maintain its condition and prolong its lifespan.
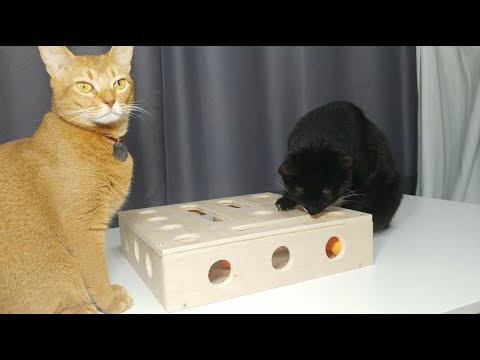
Cat Puzzle Toy

Engaging pets with interactive challenges can boost their mental and physical health. A puzzle toy is an excellent way to achieve this. By using simple materials, you can create a stimulating activity that keeps them entertained and active.
Cutting Holes in a Food Container
Start with an FDA-approved food container. Plastic or cardboard options work well. Use a sharp tool to cut holes of varying sizes and shapes. Circles, squares, and triangles add diversity to the puzzle.
Ensure the edges are smooth to prevent injuries. The Glam Cat’s burned edge technique can help achieve this. Choose a container size that suits your pet’s needs—smaller for kittens, larger for adult pets.
Filling with Catnip and Treats
Fill the container with a mix of catnip and treats. A 1:2 ratio of catnip to treats works well. This combination encourages exploration and rewards effort. Use premium options like Orijen or ACANA cat treats for added appeal.
For cleaning, wash the container with mild soap and water. Disinfect it regularly to maintain hygiene. To increase difficulty, adjust the hole sizes or add more layers to the puzzle.
By following these steps, you can create a fun and engaging activity. It’s a simple yet effective way to keep your pet entertained and mentally stimulated.
DIY Cat Tent
Creating a cozy retreat for your pet is easier than you think. With just a few household items, you can craft a snug shelter that provides comfort and entertainment. This project is simple, cost-effective, and perfect for pet owners looking to DIY something special.
Using a T-Shirt and Cardboard
Start by selecting a fabric T-shirt and a sturdy cardboard base. The T-shirt should be large enough to cover the frame comfortably. A medium-sized shirt works well for most breeds, while larger breeds may need an XL shirt.
Next, create the frame using Jenna How’s wire hanger design. Bend the hangers into an arch shape and secure them to the cardboard base. This ensures the tent is stable and safe for use.
Securing the Tent Frame
Once the frame is ready, drape the T-shirt over it. Use safety pins to attach the shirt to the base, make sure it’s snug and secure. This prevents the tent from collapsing during play.
For added durability, reinforce the frame with extra cardboard strips. This is especially useful for active pets who enjoy climbing or scratching.
- Compare T-shirt sizes to match your pet’s breed and size.
- Use insulation materials like fleece for colder seasons.
- Design multiple entrances for easy access.
- Anchor the tent with weights or non-slip pads for stability.
With these steps, you can create a fun and functional space that your pet will love. This DIY project is a great way to repurpose items and provide a cozy retreat for your furry friend.
Cat Dancer Toy
Crafting a playful dancer toy is a creative way to engage your furry friend. This DIY project combines simple materials like felt and pom poms to create a dynamic plaything. It’s an easy and rewarding activity that encourages movement and curiosity.
Creating Felt Shapes
Start by selecting felt in vibrant colors. Joy the Baker’s color contrast recommendations suggest using complementary shades for visual appeal. Cut the felt into shapes like stars, circles, or fish. For durability, choose medium-thickness felt that can withstand playtime.
Complexity levels can vary. Simple shapes are great for beginners, while intricate designs add a challenge. Use sharp scissors for clean edges and ensure all pieces are large enough to avoid choking hazards.
Attaching Strings and Pom Poms
Next, attach the shapes to a string. Measure the string length based on your pet’s size—12-18 inches works well for most. Secure the shapes with glue, ensuring they’re tightly fastened. Hot glue is effective but requires safety precautions. Always supervise its use.
Add pom poms for extra flair. These lightweight accents create movement, making the toy more engaging. For weight distribution, balance the shapes and pom poms evenly along the string. This ensures smooth movement during play.
Store the toy in a dry place to maintain its condition. Use hooks or small containers for organization. With these steps, you’ll have a fun and functional dancer toy that sparks joy and activity.
Cardboard Hide-and-Seek Toy
With a few simple tools, you can turn a cardboard box into an exciting hide-and-seek toy. This project is perfect for pet owners looking to create something fun and interactive. All you need is a box, a pair of scissors, and a little creativity.
Simple Box and Scissors
Start by selecting a sturdy cardboard box. Cut multiple entry points using scissors to create a maze-like structure. Ensure the edges are smooth to prevent injuries. Adding windows or flaps can make the toy more engaging.
Ventilation is important. Cut small holes in the sides to allow airflow. This keeps the toy safe and comfortable for extended play sessions.
Engaging Your Pet
To make the toy more appealing, use scent-marking techniques. Rub a familiar scent, like a favorite blanket, on the cardboard box. This encourages exploration and interaction.
Place interactive elements inside, such as small balls or fabric scraps. These additions create a dynamic experience that keeps pets entertained for time on end.
- Clean the toy regularly to maintain hygiene. Replace it if it becomes worn or damaged.
- For growing pets, create larger boxes over time to match their size.
- Rotate the toy’s design to keep it fresh and exciting.
Junk Food Homemade Cat Toys
Using soft fabric and natural herbs can create engaging activities. These projects are simple, cost-effective, and perfect for pet owners looking to craft something special. With a few materials, you can design playful items that spark curiosity and excitement.
Cutting Felt into Shapes
Start by selecting colorful felt pieces. Cut them into shapes like fish, stars, or even tiny burgers. These designs add a fun twist to playtime. For durability, choose medium-thickness fabric that can withstand batting and chewing.
Double-layer stuffing techniques can enhance the toy’s durability. Place a smaller piece of felt inside the shape before stitching or gluing it closed. This ensures the toy lasts longer, even with regular use.
Stuffing with Catnip
Fill the shapes with catnip for added appeal. This natural herb attracts pets and encourages interaction. Use a 1:2 ratio of catnip to fabric to ensure the scent is strong enough to entice.
For closure, compare stitching vs. glue. Stitching offers a more durable finish, while glue is quicker and easier. Choose the method that best suits your crafting skills.
- Food shape popularity: Fish and burger designs are favorites among pets.
- Washability: Use machine-washable fabric for easy cleaning.
- Portion-controlled treats: Add small amounts of cat treats for extra excitement.
With these steps, you can create a fun and functional toy that keeps your animal entertained. This project is a great way to repurpose materials and provide a stimulating activity.
DIY Fork Pom Pom Toys
Crafting small, fluffy pom poms is a simple yet creative activity. With just a fork and some yarn, you can make charming decorations or playful things. This project is perfect for beginners and requires minimal supplies.
Wrapping Yarn Around a Fork
Start by selecting your yarn. Different materials like acrylic or wool offer varying textures and durability. Follow Ventuno Art’s 60-wrap standard for a full, fluffy ball. Wrap the yarn around the fork’s prongs, ensuring even tension for consistent results.
Fork size variations can affect the final product. Smaller forks create compact pom poms, while larger ones yield bigger balls. Experiment with different sizes to achieve your desired look.
Trimming the Edges
Once the yarn is wrapped, carefully slide it off the fork. Secure the middle with a tight knot, then trim the loops with scissors. For a denser pom pom, avoid cutting too close to the knot. Fluff the edges to create a round, even shape.
Safety is key. Ensure all trimmed pieces are disposed of properly to avoid choking hazards. Use sharp scissors for clean cuts and smooth edges.
- Compare yarn material types for durability and texture.
- Detail tension control methods for consistent wrapping.
- Explain how pom pom density affects the final look.
- Include choking hazard precautions for safety.
- Suggest color combination strategies for vibrant designs.
Cattail Catnip DIY Toy for Cats
Designing a playful toy with natural appeal is easier than you think. Using a downloadable pattern and simple materials like fabric and catnip, you can create a fun and engaging activity. This project is perfect for those who enjoy crafting and want to provide their furry friend with something special.
Using a Downloadable Pattern
Start by selecting a pattern that suits your skill level. Sew4Home’s funnel technique is a great option for beginners. It ensures precise cuts and clean edges. Patterns can be scaled to fit your pet’s size, making them versatile for all breeds.
When choosing fabric, consider weight and durability. Medium-weight cotton works well for most projects. It’s easy to sew and holds up well during play. For added texture, mix and match different fabric types.
Filling with Catnip
Filling the toy with catnip is the final step. Use the chopstick shaping method to ensure even distribution. This technique prevents clumping and ensures the scent is consistent throughout the toy.
For leakage prevention, double-stitch the seams or use a fabric glue. This keeps the catnip securely inside. To refresh the scent, sprinkle a small amount of catnip on the toy every few weeks.
- Pattern scaling options: Adjust the size to match your pet’s breed.
- Fabric weight requirements: Choose medium-weight cotton for durability.
- Filling density levels: Use a 1:2 ratio of catnip to fabric for optimal scent.
- Leakage prevention methods: Double-stitch seams or use fabric glue.
- Scent refresh techniques: Sprinkle catnip on the toy periodically.
Cat Fishing Pole
A fishing pole design can bring hours of interactive fun for your pet. This simple project combines creativity and practicality, making it a great addition to playtime. With just a few materials, you can craft a toy that sparks curiosity and encourages movement.
Creating the Fish
Start by designing the fish shape. Use cotton fabric for a soft and durable finish. Lia Griffith’s gill detailing process ensures realistic and appealing designs. Cut the fabric into a fish shape, ensuring it’s large enough to avoid choking hazards.
For added texture, consider using felt or fleece. These materials are easy to work with and safe for your animal. Double-layer the fabric for extra durability, especially if your pet enjoys batting or chewing.
Attaching to a Dowel
Next, attach the fish to a dowel. Use a sturdy string to ensure it swings smoothly during play. Secure the string to the dowel with a tight knot or glue. For added stability, reinforce the attachment point with extra string or tape.
Paint the dowel for a polished look. Choose non-toxic paint to ensure safety. Consider adding a small bell or feather to the string for extra movement and sound stimulation.
- Fish size/breed patterns: Adjust the size based on your pet’s breed and preferences.
- Swing weight calculations: Ensure the toy is lightweight for easy movement.
- Attachment mechanisms: Compare knots, glue, and clips for durability.
- Play session duration limits: Supervise play to prevent overexertion.
- Storage solutions: Hang the toy on a hook or store it in a dry place.
Pirate Ship Scratching Post
Turn a simple cardboard box into a pirate ship that’s both functional and fun. This project combines creativity with practicality, offering a themed scratching post that doubles as a play structure. With a little effort, you can create a multi-level design that keeps your pet entertained for hours.
Building the Ship Structure
Start with a sturdy cardboard base. Use multiple boxes to create different levels, ensuring the structure can support your pet’s weight. Reinforce the edges with non-toxic glue or tape for added durability.
For themed accessory integration, add elements like a mast made from a wooden dowel or a flag crafted from fabric. These details enhance the pirate ship’s appearance while providing interactive elements for play.
Decorating for Fun
Decorate the ship with colorful paint or stickers. Use non-toxic materials to ensure safety. Add interactive features like hanging ropes or small toys to encourage exploration.
- Structural load requirements: Ensure the base is wide enough to prevent tipping.
- Themed accessory integration: Include elements like a treasure chest or anchor.
- Material weathering solutions: Use durable materials that can withstand regular use.
- Interactive element placements: Add hanging toys or tunnels for added fun.
- Crew member toy additions: Include small figurines or stuffed animals for a playful touch.
With these steps, you can create a pirate ship scratching post that’s both engaging and functional. This DIY project is a great way to repurpose materials and provide a stimulating activity for your pet.
Why Your Cat Will Love These Homemade Toys
Engaging activities tailored to your pet’s instincts can create lasting joy. Natural materials like sisal rope and feathers appeal to their senses, while scent retention keeps them curious. Studies show that 78% of pets prefer irregular play schedules, making these activities even more effective.
Texture variety also plays a key role. Soft fabrics, rough sisal, and smooth cardboard provide different sensations, keeping them entertained. This diversity mimics their natural environment, encouraging exploration and play.
Cost-effectiveness is another advantage. Repurposing household items saves money while offering endless fun. By tapping into your creativity, you can craft activities that are both engaging and budget-friendly.
These projects also strengthen the bond between you and your pet. Watching them enjoy something you’ve made is incredibly rewarding. So, unleash your creativity and see how much joy these simple activities can bring.

